One subject, three frames: a five-minute photography exercise
Choose an ordinary object and make three photographs that answer three different questions: where is it, what is it, and which detail deserves a closer look? A cup on a table is enough. The aim is a useful sequence, not three versions of the same picture.
Set up: 0:00–1:00
Choose a stationary object with a recognisable detail: a cup with a handle, a shoe with a buckle or a watering can with a patterned spout. Put it where you can comfortably change your view. Leave the object in place for all three photographs.
Use your phone’s usual photo mode and the same orientation throughout. Leave filters aside for this round. The five-minute plan is a suggested pace; reading and setting up can take longer. If moving around is difficult, choose a small object you can reach from a seated position.
Frame 1: the place, 1:00–2:00
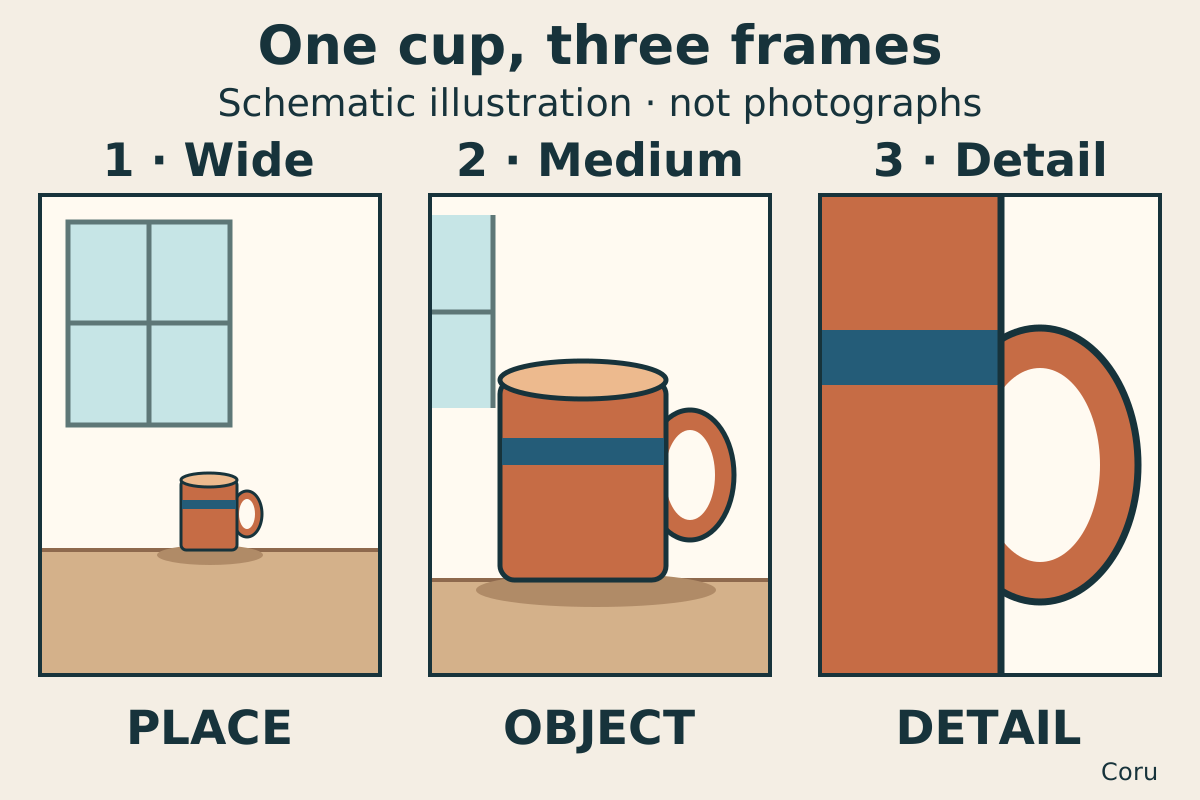
Make a wide view that shows the whole object and something explaining its setting. For the cup, include the table edge and part of a window. Before taking the picture, finish this sentence: “The cup is beside…” The missing words should be visible in the frame.
The object can be small, but you should still be able to locate it. If a bright bag or another large object attracts your attention first, change your position slightly. Keep the surroundings that help answer “where?”
Frame 2: the object, 2:00–3:00
Move closer, or choose a tighter view with your camera controls, until the complete object becomes the main subject. In this exercise, “medium” means less surrounding space than the first frame. It is not a fixed measurement.
Keep the cup’s rim, base and handle inside the picture. Look around all four edges before pressing the shutter. A tiny accidental slice of a neighbouring object can be removed by changing the framing; a visible strip of table can help the cup feel placed.
Frame 3: one detail, 3:00–4:00
Pick one feature that could not be examined easily in the wide picture. For the cup, show where the handle joins the body, with a little of its blue band. You no longer need the complete outline. Make the chosen feature large enough to inspect.
Check the saved picture. If the feature looks soft, move a little farther away and try again; filling the frame is less useful if the detail cannot be seen clearly. This is a detail photograph, not a requirement to use a macro mode or buy a lens.
Compare: 4:00–5:00
View the three saved photographs together, or swipe between them. Give each a short caption: “Cup by the window”, “Blue-banded cup”, “Handle meeting the body”. If all three captions would say the same thing, identify what is missing before taking another picture.
- Wide: can you point to a visible clue that establishes the place?
- Medium: can you identify the whole object without searching among its surroundings?
- Detail: can you point to a feature that is easier to inspect here than in the other two?
- Sequence: do all three show the same subject, and does each add information?
Fix the missing job
If the wide view already looks like the medium view, include one clear setting clue. If the medium view feels crowded, remove one distracting edge while keeping the object complete. If the detail view merely repeats the whole object, choose a smaller feature. Retake only the frame whose job is unclear.
There is no requirement to place the subject on a particular grid line. For this round, judge the photographs by the three questions. Next time, try a different object, or compare a centred composition with an off-centre one while keeping the same three jobs.
Copy this practice log
text
Subject and date:
Wide — the visible setting clue:
Medium — the complete object shows:
Detail — the feature I can inspect:
Frame to retake, if any:
One framing change to try:
After the retake, what changed?
A few words per line are enough. Keep the photographs with the note so you can compare the change.
About the exercise
Nikon’s framing guide describes wide shots as showing the scene, medium shots as tighter views with less surrounding space, and close-ups as views of fine detail. It discusses video and also relates composition to still photography. Coru created this timed still-photo exercise, cup example, schematic and self-check. Five minutes is a practice format, not a promise of a measured improvement.