Draw a repeating pattern: cut, swap and complete one tile
A drawing cut into pieces can reappear across the edges of its copies. Make one paper tile, then discover how its neighbours complete it.
The drawing comes back together somewhere else
Cut through a drawing, move the pieces apart, and the picture looks broken. Put copies of those pieces beside one another and it returns. This is the small surprise behind a repeating pattern: the edge of one tile can complete the drawing on the next.
You will make a square master, then test copies in a grid. The first drawing moves towards the outside; the empty space that appears inside becomes your second drawing. Choose your own marks: bent twigs, tiny umbrellas, keys, pebbles or invented shapes. The method stays the same.
Set up a small square
Use a 16 × 16 cm square of ordinary paper, a ruler, pencil, a dark pen, scissors and tape. The size is a convenient starting point, not a requirement. To check the repeat afterwards, you will also need four identical photocopies, or a scan that you can duplicate and print at one size.
Keep the paper flat. Reserve roughly 2 cm around every outside edge for now. Draw several separate motifs in the remaining area. Let one substantial shape cross the middle of the square so that the cuts will pass through it. Leave gaps between the motifs; you will use those gaps later.
Use a motif you can recognise after it is divided, such as a leaf with a centre line. Make a quick copy or photograph before cutting if you want to keep the starting drawing. This copy is a record, not the finished repeat tile.
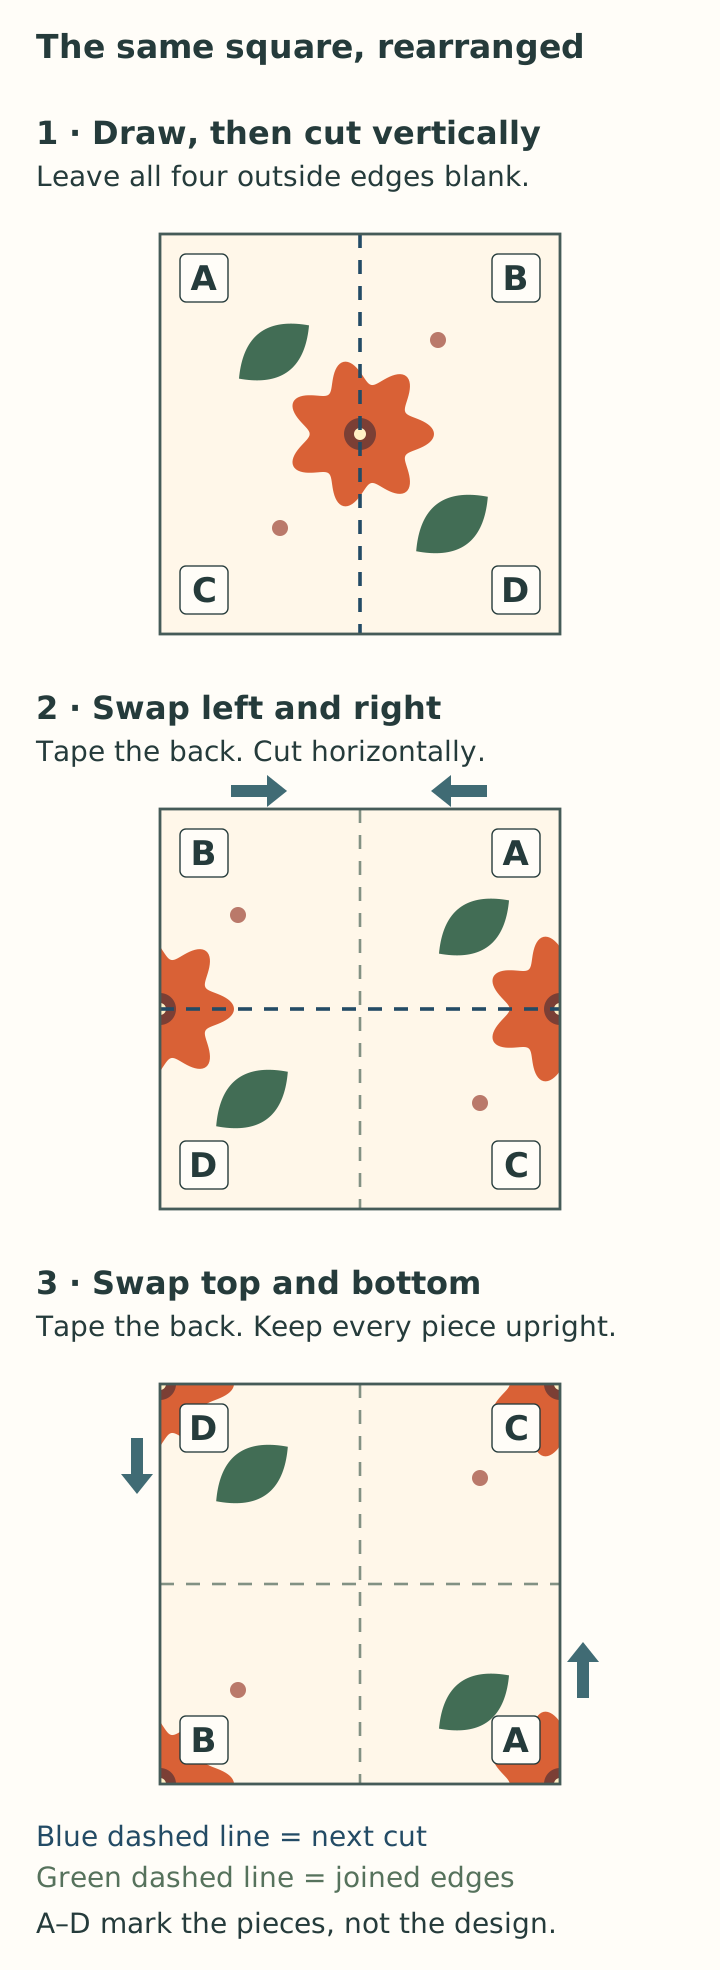
1. Cut vertically and swap the halves
Measure halfway across the square: 8 cm in this example. Cut straight from top to bottom. Slide the left half to the right and the right half to the left. Keep the drawing facing upwards and both pieces pointing the same way. Do not rotate or turn over either piece.
The two original outside edges now meet in the middle. Bring them together without a gap or an overlap. Tape this new join on the back. To do that, hold the arranged halves together and turn the whole square over; return it to drawing-side up afterwards.
In the diagram, A and B name the upper quarters and C and D the lower quarters. After this swap the order is B–A above D–C. The letters explain the movement; they are not part of the pattern.
2. Cut horizontally and swap again
Cut the reassembled square across its horizontal halfway line. You will cut through the tape as well. Slide the top half to the bottom and the bottom half to the top, again keeping their orientation. Tape the new join on the back, and secure any loose part of the earlier join.
The quarter order is now D–C above B–A. Your first drawing has moved towards the four outer edges. The blank margins have come together inside. If the rearranged drawing looks strange, that is expected: part of each motif now belongs visually to a neighbouring copy.
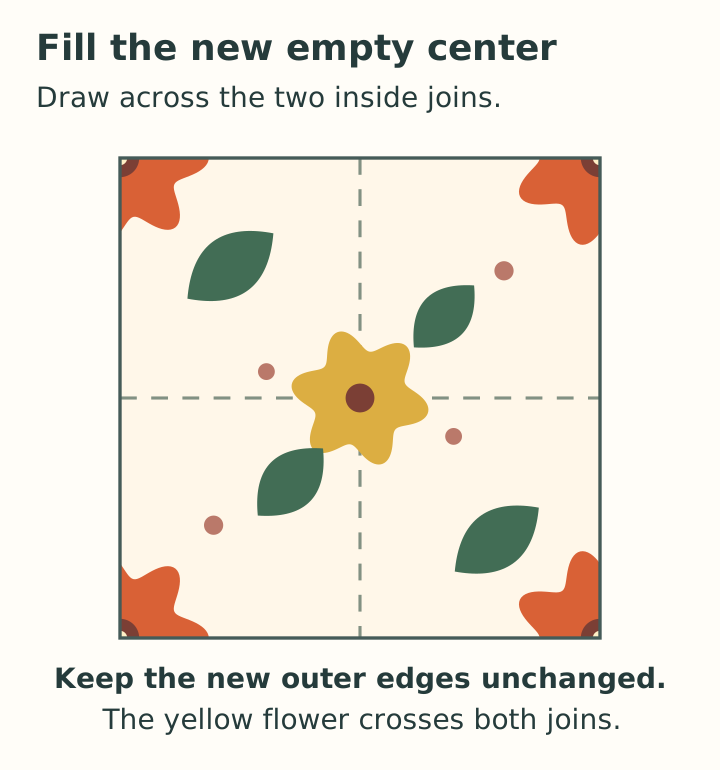
3. Draw into the new centre
Add a second group of motifs in the empty interior. You may draw across the taped joins: these lines are inside your tile. Keep every new mark away from the outer boundary, where the matching halves of the first drawing are already waiting.
Try a small cluster off-centre, then a quieter mark elsewhere. You do not have to fill every gap. A dense dark patch will return in every copy; a long empty channel will return too. Look at the spaces as deliberately as you look at the objects.
Leave the background as plain paper for this first attempt. A wash that is darker at one edge than the opposite edge can reveal the square even when the drawn shapes join correctly.
4. Test four unchanged copies
Make four copies of the finished tile, all at the same scale. Trim precisely to its square boundary, removing any extra printer margin without cutting into the artwork. Arrange two copies above two copies, drawing-side up. Keep every tile in the same orientation and bring the edges together without overlaps.
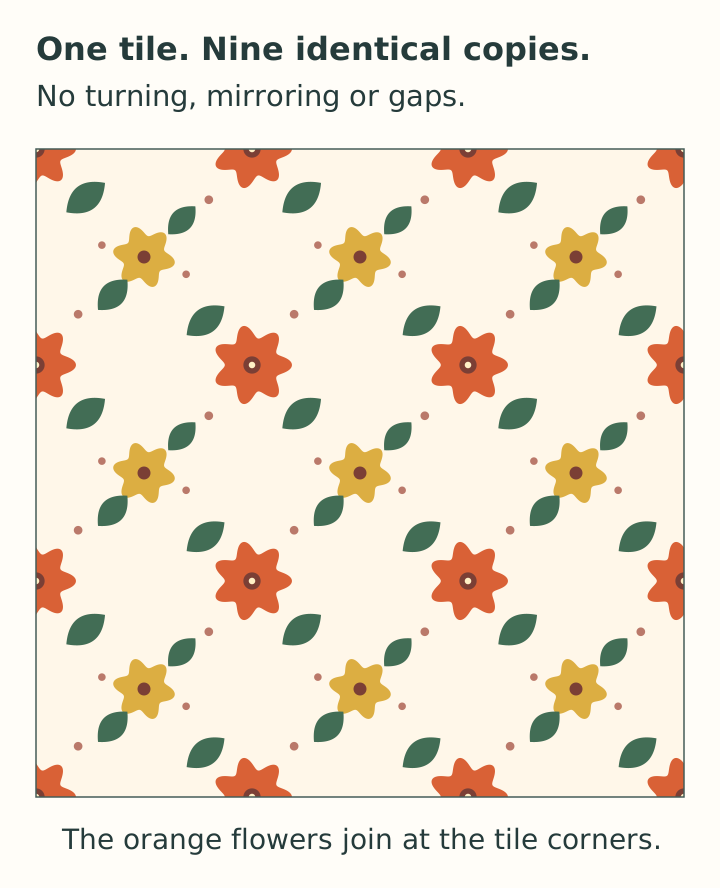
Look first at a vertical join, then a horizontal join, then the point where all four tiles meet. Follow one split motif with your finger. Its parts should meet across the boundary. A 3 × 3 grid, like the example below, also helps you see the rhythm over a larger area.
If you do not have a copier or printer today, keep the finished master flat and make the copies later. A single tile cannot show you every relationship that appears when it repeats.
If the join shows
- A motif jumps sideways: check that no piece or copy was turned, and that the halves were aligned before taping.
- A thin white stripe appears: check for a printer margin or a gap between copies before changing the drawing.
- A new line stops at an edge: you may have added a mark after the swap without a matching continuation on the opposite edge. Remove that addition or redraw it inside the tile.
- The shapes join, but the squares remain obvious: inspect repeated dark patches and empty bands. Adjust an interior motif, copy the revised master, and compare again.
Why it works—and what to try next
The two sides of your first cut fitted together before you moved them. After swapping, those same sides sit on opposite outside edges. A neighbouring copy reunites them. The second cut does the same thing in the other direction. You have changed where the square begins, while preserving the joins.
For a second version, keep the edge fragments exactly as they are and change only the centre. Compare one large central motif with three small ones. Which version makes your eye move across the grid? Which makes it stop at each square? Neither is automatically better: choose the effect you want.
Use the repeated sheet as a small notebook cover, a paper band around a gift, or the background for a handmade card. Save the master separately. That one square is enough to rebuild the pattern.