Make an eight-page mini zine from one sheet of paper
One sheet becomes a small book with a front cover, six inside pages and a back cover. Make the folds, cut only the middle slit, then bring the ends together. You can start with blank paper; the printable guides are optional.
What you need
Use one ordinary sheet of A4 or US Letter paper, scissors and a pencil. A zine is a small publication you make yourself; this version needs neither staples nor glue. If a child is making it, help with the scissors as needed.
Make a blank practice copy before lettering a finished one. The eight pages include both covers: there are six pages inside, not eight.
Optional: print a folding guide
Choose the PDF that matches the paper in your printer. Print one side only, landscape, at Actual size or 100%; turn off booklet printing and multiple pages per sheet. Do not trim the paper. The important marks sit away from its outer edges.
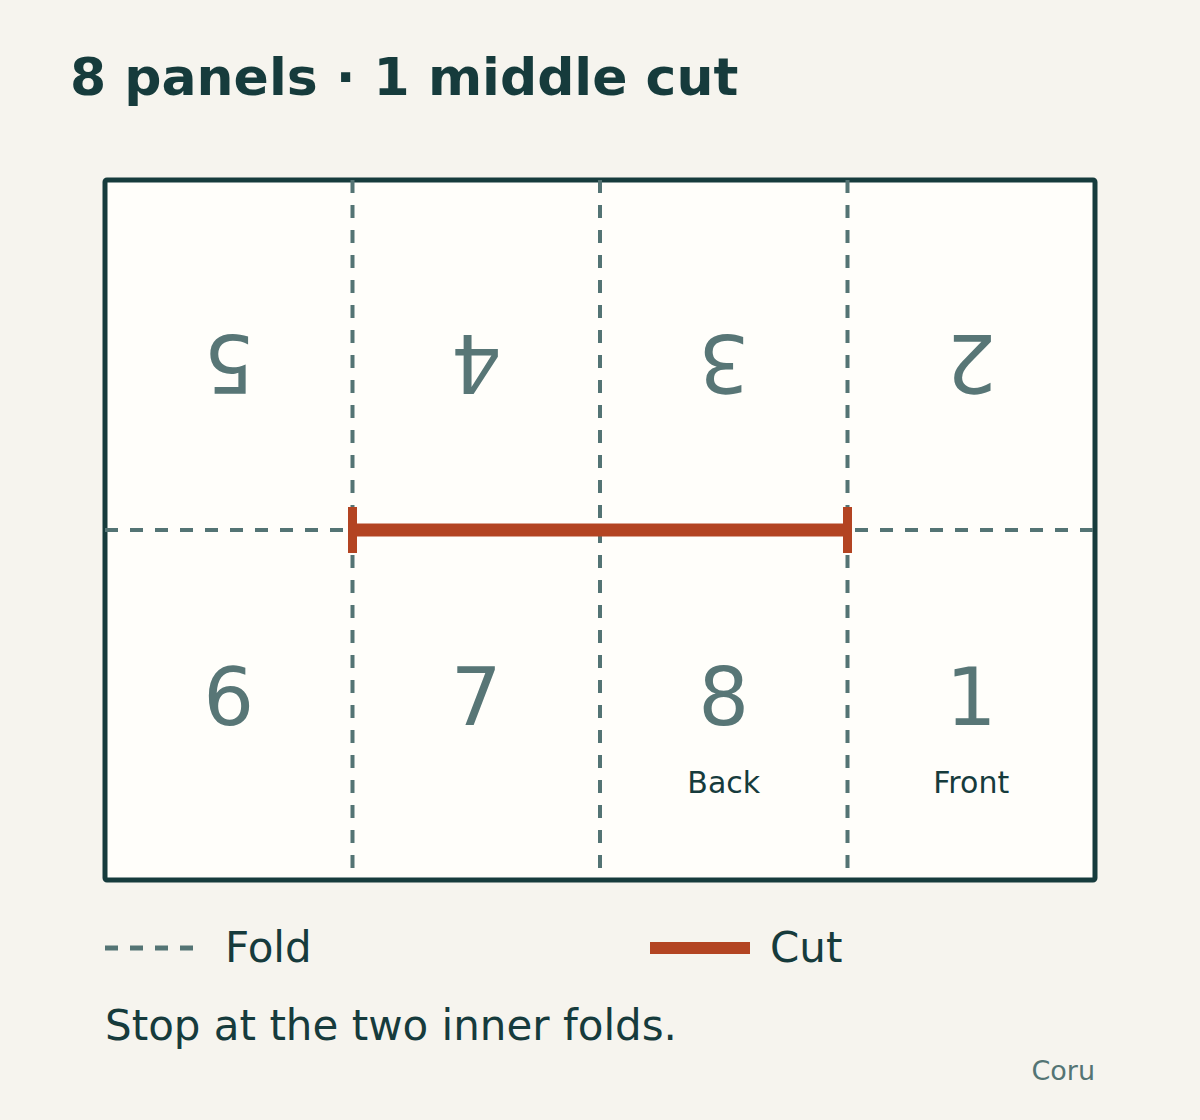
The light numbers count every page: 1 is the front cover and 8 the back. Dashed lines are folds; the solid central line is the only cut. When the sheet is flat, the top row is deliberately upside down.
A4 folding template (PDF, 1 page)
Print one side only on matching A4 paper, landscape, at 100%. Do not trim.
US Letter folding template (PDF, 1 page)
Print one side only on matching US Letter paper, landscape, at 100%. Do not trim.
1. Make eight panels
Place the sheet landscape, with its longer edges along the top and bottom. Bring the bottom long edge to the top long edge and crease. You now have a long, narrow strip.
Fold that strip in half by bringing its short ends together. Fold it in half the same way once more. Unfold everything: there should be four equal columns and two equal rows. Align the paper edges when folding, rather than trying to measure each panel.
2. Cut the middle, not the outer edges
On the open sheet, the cut follows the horizontal centre crease across the two middle columns. It starts at the first vertical crease and ends at the third. Leave the outer two sections of that horizontal crease uncut.
To reach the middle with scissors, bring the sheet’s left short edge to its right short edge. Cut through both layers from the midpoint of the folded edge along the existing crease, stopping at the next vertical crease. Open the sheet and check: one straight slit in the middle, no cut reaching an outer edge.
3. Open a diamond, then close the book
Refold along the long horizontal crease to make the narrow strip. Keep the side you want to read on the outside; with the template, the numbers must be visible.
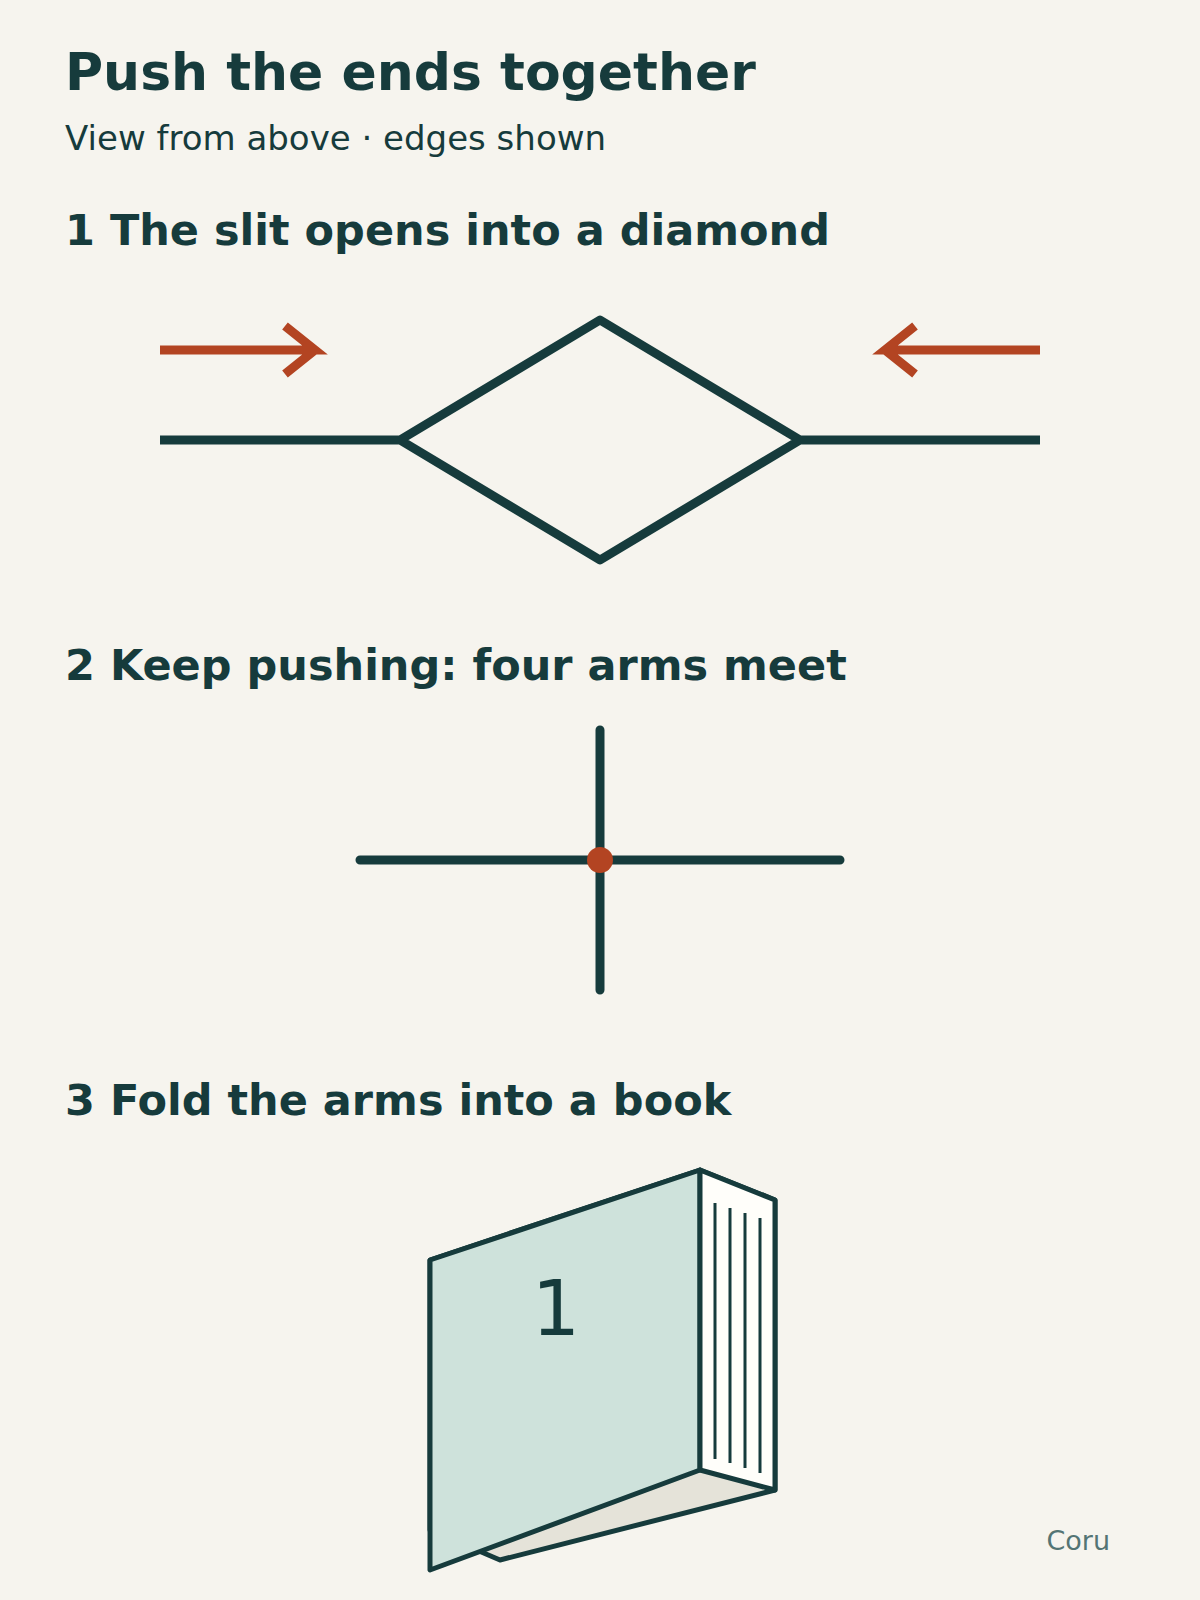
Hold the two short ends and push them gently towards each other. Separate the two edges of the slit so its middle opens into a diamond. Keep pushing until the diamond closes and the folds form four arms meeting at the centre, like a plus sign seen from above.
Bring the arms together into a book. With the template, wrap pages 1 and 8 around the outside as the front and back covers. Smooth the folds. Turn the pages: you should find 1 through 8 in order.
If the result looks wrong
- The slit will not open: unfold the sheet and check that the cut crosses both middle columns. Do not extend it towards the outer edges.
- The paper separates into pieces: the cut reached an outer edge or crossed the wrong crease. Start again with a new sheet and mark the two stopping points before cutting.
- Numbers are hidden inside the folds: reopen the long strip and put the printed side on the outside.
- A page is upside down or out of order: check the flat map against the diagram, then refold with 1 on the front and 8 on the back. If you wrote on blank paper before folding, use a practice copy to mark each page’s top and number first.
- Some corners stick out: reopen and align the creases before pressing them flat. Small differences are normal; do not cut the folds off to tidy the book.
Fill it: one cup, six views
Try a tiny book about an ordinary cup. Give each inside page a different job, so you have something to turn the page for. You need only a pencil; a few lines or words are enough.
- 1 — Cover: “One cup, six views”, with a small sketch.
- 2 — Draw the whole cup in outline.
- 3 — Zoom in on just the handle.
- 4 — Draw its shadow as a single shape.
- 5 — Show where the cup usually lives.
- 6 — Write one sentence about a memory it brings back, or invent one.
- 7 — Give the cup an impossible new job, such as carrying a cloud.
- 8 — Back cover: your name or pen name, and the date.
Keep the page order when making copies
The easiest first copy is written after folding. If you want to work flat, number the pages and mark their tops in pencil while the book is still assembled, then unfold it. Keep words clear of folds and the cut.
Our flat template uses the top row 5–4–3–2, rotated 180°, and the bottom row 6–7–8–1 upright. Fold a test print before making more copies.
About this guide
The folding method is described by Getty Education, State Library Victoria and the Library of Congress. The diagrams, printable layout, troubleshooting checks and cup exercise here were made for Coru.